The Import and Export actions allow users to manually extract and copy existing content items (and folders) from one Pyramid instance into "PIE" files and then allowing them to import those "PIE" files to an alternative Pyramid instance or destination. For example, you may have a test environment and a production environment and need to copy the tested content and structures to the final production instance.
Import / Export are the manual operations that can be performed with either the Migration Wizard or using the export / import API functions. The functions can work on single or multiple content items, related content items, and entire content folders.
Copy-Deep Paste
While the migration approach is generally used for moving content between two or more Pyramid instances, users are often tempted to use the import-export process to copy wholesale structures from one location to another WITHIN the SAME Pyramid instance, since it duplicates the entire content hierarchy.
Functionally, this is a legitimate process using the manual import-export model with external PIE files. However, it is identical to the simpler "copy-deep paste" functions using the UI and context menus.
PIE Files
Pyramid Import-Export files or "PIE" files are the medium through which content is exported and them re-imported. When an export operation is performed, a PIE file will be presented back to the user through the browser as a download-able. This file can then be imported through the browser as part of the import operation.
Be aware that a PIE file can only be imported to a Pyramid version that is the same or newer than the version from which it was exported.
Accessing Import-Export
The two functions are exposed primarily through the different views of the content manager. However, they appear on different menus and panels.
Export
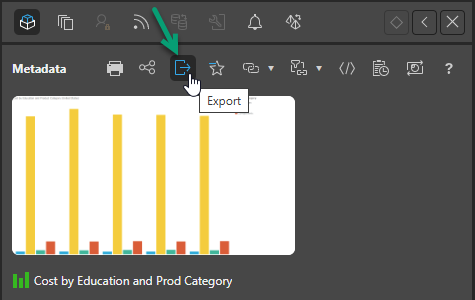
The export action is available from any of the content manager views through an item's context menu or a specific item's action panel (examples shown below). After triggering the export action, the user will be prompted with an export options dialog - that influences what is exported and how the import will operate on the PIE file.
Exporting large collections of content can take some time to execute. Please be patient during export processing.
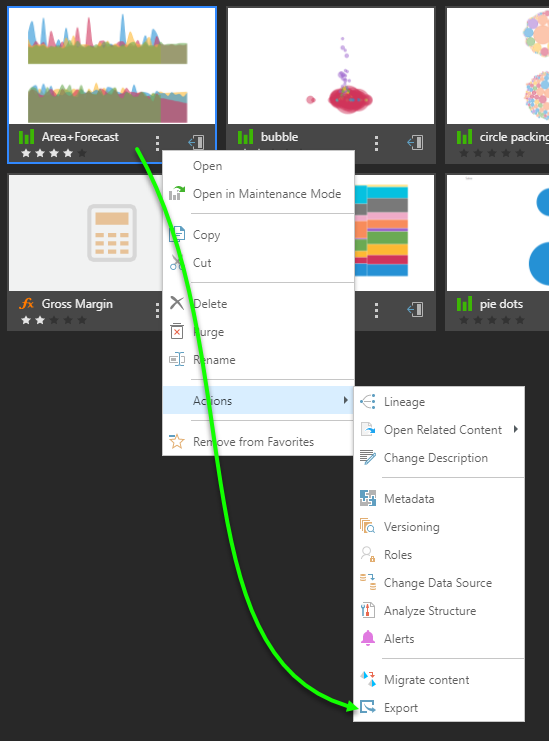
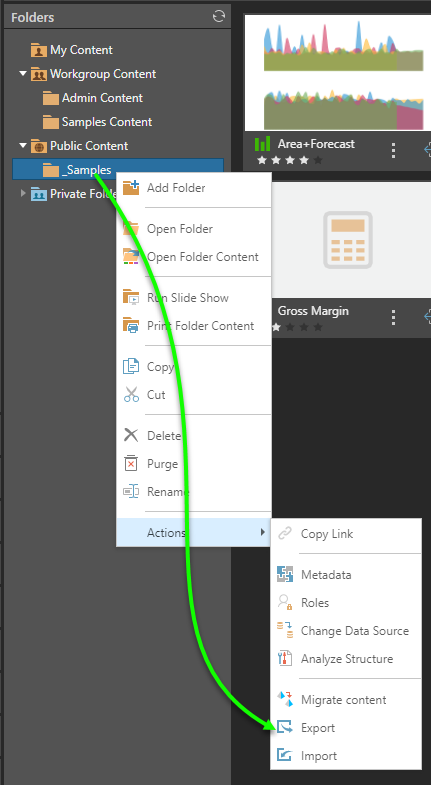
The function is also available for folders from the Content Explorer - using the folder tree context menu, a folder item in the content listing or via the folder's action panel (example shown below).
Export Options
Once the export action is triggered, the user is prompted with a follow up Export dialog:
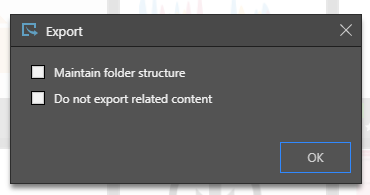
- Select Maintain Folder Structure - if you are migrating a folder or a selection of items that contain folders. This option maintains the structure of sub-folders within the selected folder on the target instance. Related content from other tree branches will be imported to the root of the target instance.
- If this switch is not enabled, the content will appear as a single flat list of items when re-imported into the target folder destination.
- By default Do not export related content is not selected. This means that all related content for the items selected for export are INCLUDED in the export. Related contents include all nested items used in the content tree. If you select this option, a warning is shown that indicates that not exporting related content (only exporting the selected items WITHOUT any nested elements) could result in an invalid model. (See Lineage or Related content for a deeper explanation for nested, hierarchical content).
Import
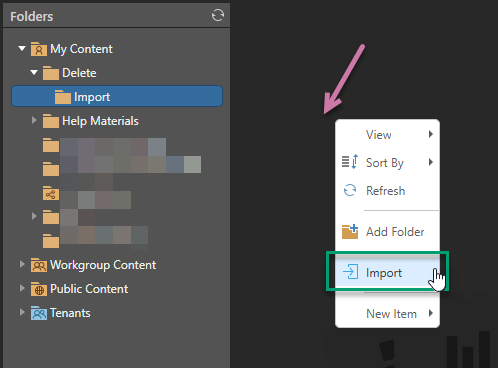
Unlike the export action, the import action is only available in the content explorer view since it needs a folder destination to operate within. As such, there are three entry points for importing PIE files that were previously extracted.
The first is using the context menu of the folder tree - where the contents of the PIE file will be imported INTO the selected folder on the tree.
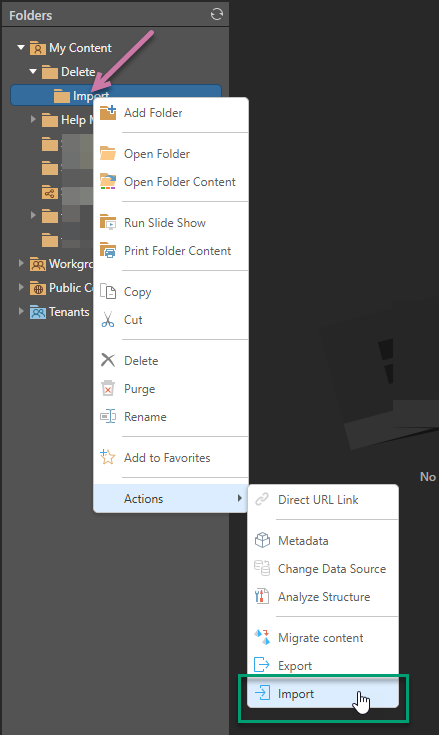
The second is using the context menu of a sub-folder item in item listing - where the contents of the PIE file will be imported INTO the selected sub-folder.
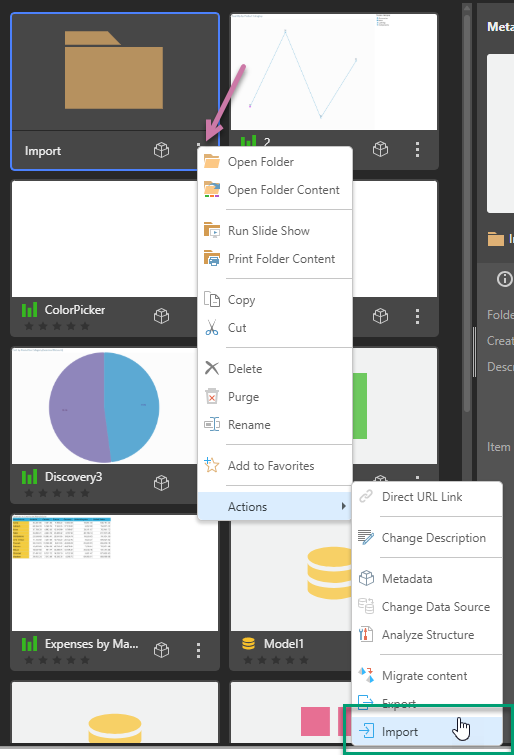
The last is using the background context menu of the item listing - where the contents of the PIE file will be imported INTO the currently selected folder.
Note: Importing large collections of content can take some time to execute. Please be patient during import processing.
Encountering Import Error
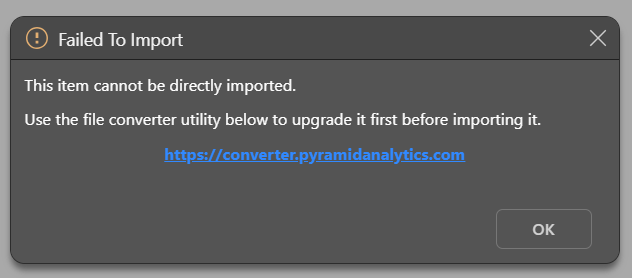
See PIE and PAT export file converter for more details.
Move to Destination
If there are duplicate items, the Move to Destination dialog opens during your import. Use this dialog to tell Pyramid how to resolve any potential import conflicts, ensuring you do not end up with duplicate files or IDs or an unwanted proliferation of identical files.
The Move to Destination dialog box includes the following options for each file or folder reporting a clash:
Replace Files
(Files only.) Replace each duplicate item at the target with the new item from the source. The source item overwrites the target item and the new item (the result of the replacement) has the same name and content ID as the old item.
Bookmarks
Bookmarks are not copied between files (discoveries or presentations) in a copy-paste or import. However, where both your original and replacement files contain the same slicer type (for example, a Country slicer), Pyramid keeps the bookmarks from the original file. This means that, when replacing an OLD file with a NEW file, if both contain the Country slicer, the bookmarks associated with the OLD file are kept. If your OLD and NEW files contain different slicers (for example Country in OLD and Age in NEW), then the bookmarks are deleted.
Note: The action taken by Pyramid is reported as the Bookmarks Status once the replacement is complete. If the icon is Gray, there were no bookmarks; Green, means all slicers matched and bookmarks have been successfully kept from the old files; Red, means all bookmarks were deleted; and Orange means one or more bookmarks were deleted and one or more were kept. Hover over the Status icon to see the action taken by Pyramid.
Schedules
Schedules are also not copied between files in a copy-paste or import. Where both NEW and OLD files are scheduled to run with the same slicer type (for example, a Country slicer), Pyramid continues to run the schedule from the NEW file after the replacement has been completed.
Note: Again, the action taken by Pyramid is reported once the replacement is complete, but this time as the Schedules Status. The colors reflect the same success (Green), partial (Orange), and delete (Red) outcomes described for bookmarks by Pyramid.
Merge files
(Folders only.) Where there are duplicate items, replace the items at the target with new items from the source as described above. Where there are new source items, copy them to the target. Where there are existing items on the target that are not present at the source, leave them unchanged. In short, replace duplicate items, add new items, and leave existing items unchanged.
New
Where there are duplicate items, keep both old and new items. Rename the new (source) item by attaching a suffix and, if the item shares the same content ID as a target item, also assign it a new ID.
Skip
Ignore this item and move on to the next, leaving the target file unchanged.
Tip: Select the Apply to All checkbox before you click one of the options to apply your selection to all of the clashing items and folders.